
So, you want to know How to Start a WordPress Blog?
If yes, then we’re going to show you how to create a WordPress blog in less than 30 minutes.
Because WordPress doesn’t require a lot of coding skills to create a WordPress blog.
Today, In this guide I’m going to show you every single step you will need to start a WordPress blog.
Things You Need To Start a WordPress Blog
You’ll need the following things to start a WordPress blog:
- An attractive domain name
- A super-fast web hosting
- WordPress
- Your awareness for 30 minutes
Let’s start creating your WordPress Blog.
Step #1:
Purchasing the Perfect Domain Name
The domain name is how you get recognized on the internet.
Let’s suppose you have a business named B&H and you want to establish it on the internet, of course, it is the major market, getting a domain name for your business will surely lead your customers to your online site all over the continents ex: BandH.com.
This is how customers recognize you, simple? Take it easy, take your time, think about what suits you best and your business, cheers!
Well, the things people might try to do is, use their own name or the company they own.
Whereas others might try to bring their focus on keywords to entertain their search engine optimization but this might not just be the key in making or breaking the SEO.
Well, if you consider checking our domain name then here you go Blogrex.com.
Step #2:
Buy a Super Fast Hosting
As soon as you get a domain for yourself the very next thing you might be looking for is how to register it and set up web hosting.
Now how it works!
Web hosting is simply the service that you’ll need to allow your blog to be accessed by the users.
Your blog would most likely not be seen without a proper domain and web hosting itself, people might not get to know whether it exists! This just doesn’t work separately.
The Internet offers plenty of web hosting companies where you can choose from starting at different prices to choose from.
I highly recommend BlueHost. They are the biggest and well known hosting company, offering packages from $2.75/mo* (that’s low).
Here’s why we recommend BlueHost:
- It’s Inexpensive: You can host your site for only the price of $2.95 a month!! Isn’t that reliable?
- Free Domain: Comfy right? You can get your own but depends on you, whether you want to get it for $10+ or in just $2.95! I know you’re smart.
- Easy WordPress installation: Less knowledge about computers and tech? Well, no worries. Only a few clicks will guide you to your working blog within a blink of an eye! Amazing right? Yes, that’s what you might be thinking.
- Fast Performance: Well you are paying to get your work started and we won’t let you suffer any difficulty in that phase! Bluehost provides you with plenty of performances to keep your site loading.
Let’s start with purchasing your Domain and Hosting.
Step #3:
Setting Up a Domain & Hosting
Open Bluehost in a new window and follow the steps below:
To get started you have to click on the green button saying Choose Plan.

The next step is to select the plan you are comfortable with (I recommend the Choice Plus plan).

The next step you’ll be encountering will be “enter your domain name for your website”.

Last but not the least step is adding up your account information and finalizing the package information in order to complete the procedure. 36 monthly plan is the best value if you might be asking for suggestions.

You can always purchase some extra products visible to your screen, this depends on you now!

The best method will be not to buy them at the exact moment, they can be added up sooner or later if you encounter a need.
Once completed, an email will pop-up in your notification bar consisting of details to log in to your hosting panel or cPanel.
This is where you manage everything from support, emails, and other stuff, above all, it is the WordPress which you are going to be installing.
Step #4:
How To Install WordPress
You might see many different icons which lead to different services and features, this can be enormous in amount so you might be skipping about 95% of data and even maybe never use them.
Let’s get to the website section and click on the WordPress icon.

You’ll be redirected to the BlueHost Market Place Quick Install screen for WordPress. Click on the Install button.
The next question will be selecting your domain name.
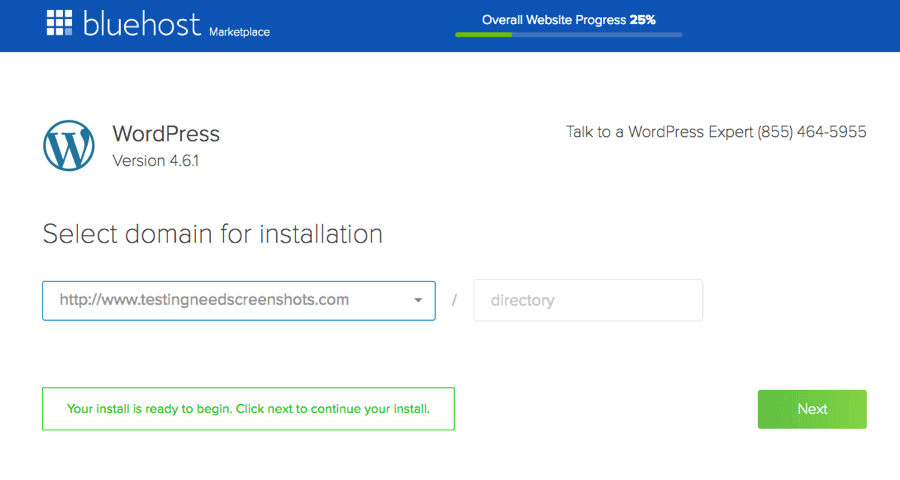
You can choose your domain name from the drop-down and click next to continue after selecting.
Enter your site name, username, and password for the site. Maybe it will ask for checking all the check-boxes, click install after that.

Quick Install will install WordPress for you, the marketplace will cause you to browse themes, as the WordPress gets installed.
This is not the must-to-do thing right now, we will show you how to get themes in the next steps.
Once the installation finishes, you can see the success notice at the top in the header bar.

Click on the Complete link of Installation, it will guide you to a screen containing your WordPress login URL and Password.
Congratulations! It’s done. You have now your own WordPress site. Not too tough right?
This is what your WordPress login will look like:
http://yoursite.com/wp-admin/
Now click on the WordPress login link to login to your dashboard.
From here you can fully customize your site the way it looks and gets your ass to work.
Step #5:
Choose a Perfect WordPress Theme
Themes are the base of how your WordPress blog will look like, it controls the visual appearance of your content.
The preview button helps to get an idea of how your WordPress will look like.
This doesn’t look much attractive eh?
Changing the look and the feel of your blog is a much exciting thing to do and the best part it serves you with a better appealing WordPress site.
You can find a dozen of WordPress themes that you can install on your site, they might be free or paid at the same time.
No need to confuse yourself with the editing stuff, go with the PixiGo theme, it’s totally clean and simply designed with the max performance you can achieve.

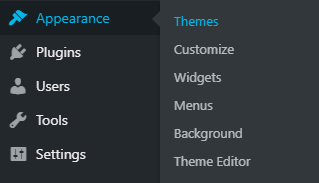
You can change your theme by going to your WordPress dashboard and clicking on Appearance > Themes.
Click on the Add New button, on the next screen you will be able to see free WordPress themes that are available on the official WordPress.org themes directory.

When you have found the best theme that suits your content, bring your mouse to it and click to install that theme.

Let it be installed.
It will change once it is installed, showing the install button to activate the theme.
Customization can take place once you have activated the theme of your choice, customize link is under the appearance menu.

Get started by creating your First Blogpost!
Step #6:
Your First Post
Click on the Posts > Add New menu in your WordPress dashboard, when writing your first blog post.

You may find an editor area where you can start writing your first blog.
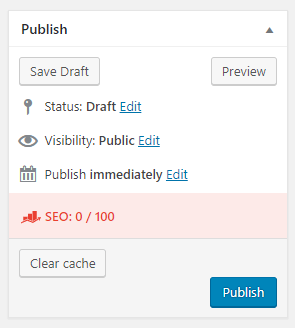
When you think you have done writing, click on the publish button on the right to publish your content to the world out there.
There might be some other sections on the posts screen as well such as Categories and Tags. You can use these to organize your blog posts.
Step #7:
Plugins & Other Customization
As soon as you have all your system geared up, it’s time to set up your WordPress now. To change your settings Login to your WordPress admin panel and follow these steps.
After writing your own first blog post, you would be looking forward to adding other essential elements to your site, these can be things such as contact forms, Google analytics, WordPress SEO, etc.
Let’s get this thing started with some WordPress setting management.
Permalinks
Talking about permalinks, these are the permanent URLs to address one’s web page or a blog post! Also on your category and tag archives.

It simply shows you the way to one’s website, for instance, consider the house address of someone which leads you to the person’s home, same is the case with permalinks, simple right? URL must be fixed, no changes are preferred that is why we call it a permalink.
Click On the Settings Button On Your Left Side Then Click On Permalinks:
- Now Click On Custom Structure
- Now Put This /%postname%/
- Now Click On the Save Changes.
Set Your Timezone
Following a Time Table may be a difficult task if you impose it on yourself, consider working from Pakistan and managing yourself in US timezone, this can cause your normal life functioning.
- Go to Settings
- Head over to general
- There you will note the time zone field
- Go ahead and choose your time zone.
- You can also change the starting day of the week
Save your changes.
Now as we are done with our WordPress settings you can now simply install the plugins and you are good to go!
Yoast SEO: Yoast SEO is one of the most widely having general approval WordPress plugins around and it is simple, not hard to get through knowledge, why if you are running a personal blog or you are an SEO expert managing a place on the net for a person for whom one does work, Yoast is a powerful apparatus for making or put right things that can help you make your place as look for engine-friendly as possible.
W3 Total Cache: W3 total cache improves the SEO and user experience of your website by increasing the performance, reduction in the load time is observed through features like content delivery network (CDN) integration and the latest practices.
UpdraftPlus: UpdraftPlus simply just creates a backup and works for restoring data. It’s probably the world’s most highest ranking and most popular scheduled backup plugin with a current of more than two million active installs. There are some paid versions that backup your data to Microsoft OneDrive, Microsoft Azure, Google Cloud Storage, Backblaze B2, SFTP, SCP, and WebDav.
Sucuri: The things Sucuri would be helping you with are these DDoS Protection Malware Detection Malware Removal Malware Prevention Blacklist Removal, consider yourself totally protected from any online issue.
WP Smush: Now image optimization is very important, no one wants to upload a low-quality portrait to a well-managed site, that’s why WP Smush is here! It is very easy to use in general. You can optimize your images on the fly as you upload them to your WordPress site.
For your older images, you can go to Media » WP Smush to bulk smush 50 images at a time.
WP Forms: It is the basic form creating plugin anyone can easily collaborate with. The drag&drop online form builder makes it easy for you to create a beautiful contact form, email subscription form, payment form, and other types of online forms within a few minutes.
CAOS for Analytics: The Complete Analytics Optimization Suite (CAOS, Formerly Known As “Host Analytics is Local”) is a cool plugin for WordPress. It allows you to fine-tune your websites’ performance by enabling you to self-host Google’s Analytics JavaScript file.
But, If you want a plugin to perform a special function that is not written in the above list, you can simply go to Plugins in the WordPress admin panel and type the feature name that you want.
WordPress will show you a lot of plugins according to that no need to worry.
Wrapping It Up
This is the point where you now own a fully-functioning blog build on WordPress.
We have told you how you can set up a WordPress blog in under 30minutes!
Now, all that’s left to do is start writing blog posts that people love to read. You’ll probably also want to:
- Learn SEO so your blog ranks higher in Google search.
- You need to learn Keyword Research as well to find the perfect keyword for your blog.
We hope you’ll be achieving your goals, Congratulations on setting up your own WordPress blog!
If you need any type of help or have any questions about the topic do let us know in the comment section below and we will surely try to help you out with the best solution possible!
Great info – thanks for sharing!
Welcome Sebastian. 🙂
Is This package $2.75/mo* of BlueHost is Compatible For the Websites that Developed Using Asp.Net and Php Languages?
If you’re having low traffic then it’s good else you’ve to go for a big plan.